READ FAQS BEFORE CONTINUING:
Summary
Q: What's the purpose of this extension?
A: Create different ESC/POS commands that thermal printers can interpret as text, images, bar codes, qr codes. In order to print RECEIPTSQ: How does this extension manage the connection to the printer?
A: My "Thermal printing extension" itself doesn't manage any connection to the printer. You can use the in-built Bluetooth component for that (That method is used in the demo .apk and .aia i provide). But i also created another separate extension called Simple Socket that allows you to connect to the thermal printer via IP Address in a local network. That extension is included for free in your purchase.
Basically you could print via Bluetooth and Network.Q: How do i know my printer would be compatible with this extension?
A: If your printer is for receipts and is ESC/POS compatible and has either LAN, WIFI or Bluetooth connection it will work. Just in case i included a demo apk.Q: I purchased your extension i can print images but couldn't print text
A: This can be a common issue depending on the language of your desire and your printer capabilities. The extension itself can manage different Foreign languages and was tested on: Arabic, Russian, Chinese, Japanese, Katakana, Kanji, and others. Some cheap printers can't handle more than one alphabet. So i found a workaround and it is to create a Layout and put all the content of your desire in it. Convert that Layout using a third party extension into an Image and use my extension to print that image. I could provide you with an .aia file to demonstrate that solution. ONLY IF YOU ALREADY PURCHASED THE EXTENSION.Q: I cant Print via Bluetooth due to permissions.
A: As i already stated this extension doesn't manage bluetooth connections. That's a job for the internal Bluetooth component. Make sure your app requests the BLUETOOTH_CONNECT and BLUETOOH_SCAN permissions and you allow them.
Description
This extension allows you to print text, images, bar and qr codes, etc in a Thermal Printer.
Explanation of blocks
Text
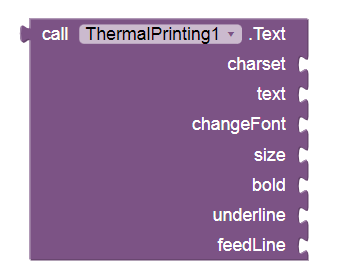
This block returns a command for printing a text
Parameters
charset – a string for the character encoding for example “UTF-8”
text – a string which value will be the printed text
changeFont – a Boolean value (true or false) for changing the printer font
size – a number (0-3) to define the text size
bold – a Boolean value (true or false) to define bold font
underline – a Boolean value (true or false). If true is used, a line under the text will be printed
feedline – a Boolean value (true or false) if a true value is used, the printer will feed a line after the text is printed. This will be for most cases. Use false only if you are going to use the Tab Function.
Align

Returns the command for setting the alignment of the printer.
Parameters :
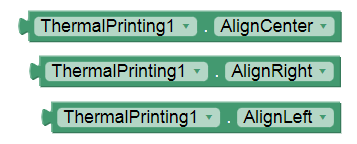
alignment – expects a number to set the alignment
0 for Left , 1 for Center, 2 for Right
Or you can just simply use these blocks:
TextOptions
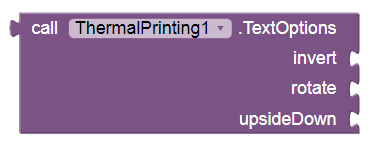
This block will set extra options to text.
Parameters
invert – a Boolean value. True, will print the text in a black background so the text can be white. False is normal
rotate – a Boolean value. True will rotate the text 90 degrees. False is normal
upsideDown – a Boolean value. True will set the text Upside Down. False is normal
SetCodePage

This block returns the command for setting the code page for your printer.
Parameters :
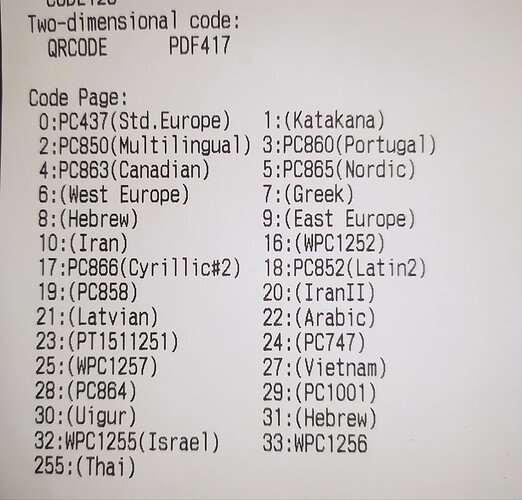
codePage – excepts a number for the Code Page to be set depending on your printer:
You can know this number in your printer manual, or printing the test page. See this example from my printer:
CutPaper

This block returns the command to cut the printer’s paper
Parameters :
fullCut – a Boolean value. If true the printer will fully cut the paper, if false it will be only a partial cut.
Note: Not every printer has this function.
Image
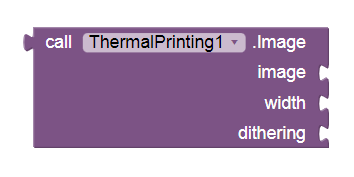
This block will return the command for printing an image.
Parameters .
image – a string including the path of the image to be printed. The image can be from assets, storage and from an URL.
width – a number for setting the width of the image, some printers have a maximum value so if it this value is exceeded the printer may not print the image but a lot of characters. So please test this number first after using it your final app. Note: 150-200 may work in most printers
dithering – a Boolean value to define if the image will be printed using dithering or not.
CashDrawer

This block will return the command for opening the cash drawer connected to your printer via a RJ connector. (Note: I have not tested this command because I don’t have a Cash Drawer)
Parameters :
pulse – a number for sending the pulse to the cash drawer
0 will send a pulse to pin 2
1 will send a pulse to pin 5
QR Code
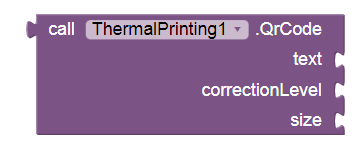
This block will return the command for printing a QR Code.
Parameters :
text – a String to indicate the text that will be printed as a QR.
correction – a number (0-3) to indicate the correction level for the QR.
size – a number (1-16) to manipulate the size of the QR Code.
BarCode
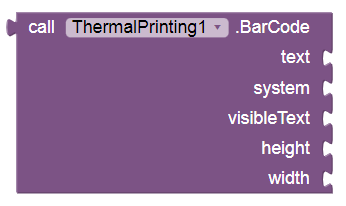
This block will return the command for printing a BarCode
Parameters :
text – a string which value is the text to be converted as barcode.
System – a number for setting the barcode system. (you can check your printer’s manual to see the supported systems)
0: UPC-A
1: UPC-E
2: EAN12
3: EAN8
4: CODE39
5: ITF
6: CODABAR
visibleText – a Boolean value. If true the text will be printer above the barcode. If false the text won’t be printed, only the barcode
height – a number (1-255)
width – a number (2-6)
Pdf417

This block will return the command to print a Pdf417 barcode
Parameters
text - a string containing the text to be converted and printed as a PDF417 barcode.
SetTabPositions

This block will set the positions when a tabulation is made
Parameters :
A List with the positions of the tabs. Example:

Tab
![]()
This block will return the command for doing a tabulation for the defined positions. You will normally use this after printing a Text with the feedLine parameter set to False.
Feed

This block will return the command to feed the printer’s paper.
Parameters
lines – a number of the amount of lines to be feed.
NEW BLOCKS
Simple Text

A block to simply convert a text String using UTF-8 encoding and feeding a line. (to save some blocks from the other text block)
Parameters:
text - a string containing the text to be printed.
TextWithEncoding

Another alternative to print text
Kanji Commands

Some printers need a flag to know when it needs to be printed with Kanji characters or not.
Alternative commands
I also included new alternative blocks to print QR, Image and cut paper as the commands needed may vary from different printers.
Printing via network (Ethernet cable or Wifi)
This extension only creates the commands for printing but it doesn’t make any connection to the printer. So, how do you communicate with it?
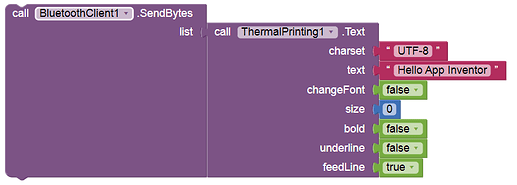
Well for bluetooth printing you can just simply use the Bluetooth Client component. Like this example:
And for Network printing (A printer connected via Wi-Fi or LAN cable to your local network)
I created another extension, Called SimpleSocket, specifically for this purpose.
It only includes two Blocks.
1. SendData
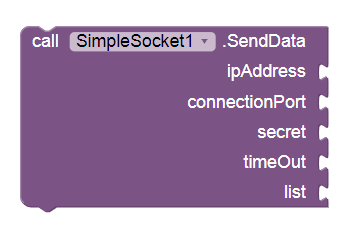
Creates the connection to the printer via its IP Address.
Parameters :
ipAddress - a string containing the ip address of your printer
connectionPort - a number for setting the port for the connection if needed (otherwise 9100 should work)
secret - a string containing the password for the connection if needed (otherwise any random string should work)
timeOut - a number to define the timeout for the connection (in ms).
list - the list with the commands for printing using the Thermal Printing extension.
Example:
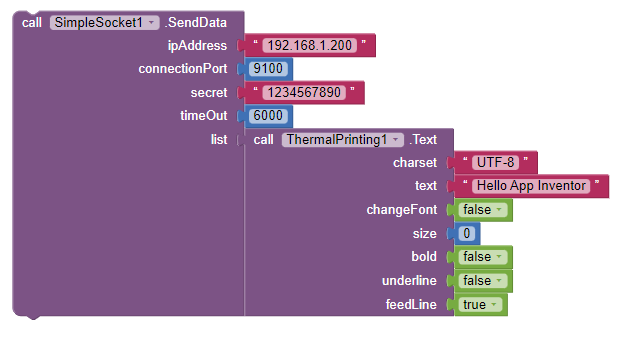
2. ErrorOcurred
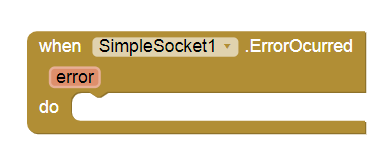
An event raised when an error is found. It will return the error message as an String.
NOTE: This extension was tested on the following printers:
• Epson TM-m10 (bluetooth)
• LOSRECAL Mini Bluetooth Printer
• 3nstar RPT0010 (bluetooth)
• 3nstar RPT006B (connected to the network via LAN cable)
What’s included with the extension?
• ThermalPrinter aix
• SimpleSocket aix
• An aia for simple understanding of the extension
Demonstration Video:
DEMO APK
Please test this apk to make sure your printer works with this extension before purchasing.
Purchase
New price:
$10 USD
Purchase link:
Thanks
To App Inventor for this amazing platform
To Shreyash for creating Rush
 .
. . Thank your for your purchase. And sorry for the late response, I'm kinda busy on weekends.