Hello Everyone. I hope you all are Good.
Today i am back with my new tutorial about how you can make upi payments using activity starter only …
So let’s start…
4 Components Required.
Activity starter ( to make & check payment)
2 Textbox ( to enter amount & note)
1 label ( to get result like payment success or fail)
Button ( to trigger the activity starter)
Now blocks Part .
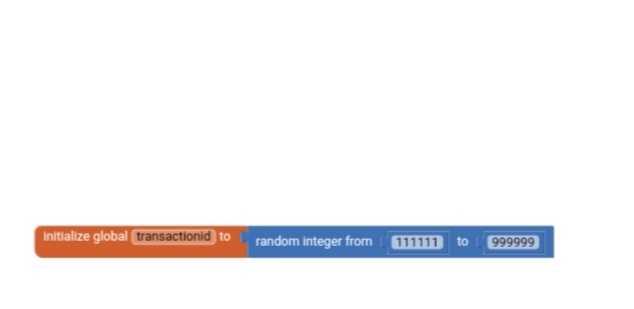
1st you need global variable to create 6 digit random transaction id for payment.

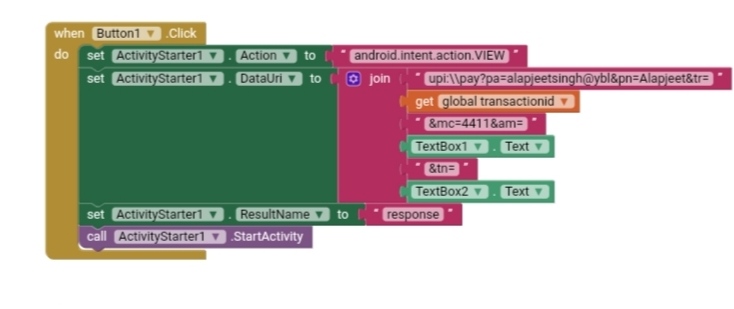
Now set activity action android.intent.action.VIEW
Now set data uri
upi:\pay?pa=your upi address like(googlepay@oksbi)&pn=Your name&tr=orderid(use global variable)&mc=4411&am=amount&tn=note
Now set activity starter result name = response
You can set all such things on button click or on screen initialize.
To start activity we will use button.
Now once activity is completed it’s time to check result .
So i am using block
After activity result .
first i use for each item & split text block to get payment status details …Because the result contains to many things like response code , transaction id , payment status etc.
Then i use local variable to split the result then i use if then block to check if the split item is status & if its true then i show the result on label 1.
I hope you all like the tutorial & i am able to explain you all the blocks.
Here i am providing aia if there is any confusion & also blocks screenshots.( To know more About (mc = Merchant Code) use google.
Upigatewayin.aia (3.1 KB)
Note:- This app completely works with
Google Pay
Phone Pe
Paytm Upi…
Not working with
Amazon Pay
Thanks…


